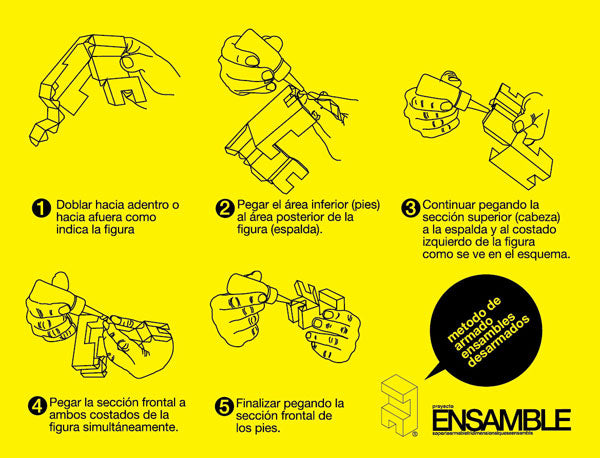
For all those who have asked for it. Here I leave the explanatory sheet. With the techniques that we will describe below, you will become an ASTRO! to assemble assemblies.
In the assembly templates , you will find numbers on the front and on the back of the template. If you match each number with its respective number on the opposite side, you will be able to assemble the assembly without any difficulty.
We, the experts in assembling wonderful assemblies, recommend using liquid silicone for gluing, the drying time of this glue allows correction and is transparent (the neatness of the final result depends on your job). To avoid going through the extreme tantrum stage or the humiliation stage for being terrible at crafts, DO NOT use cold glue, because it twists the paper. We also do not recommend using glue sticks such as (Stick-fix), since these were not designed for stick with sufficient resistance.
YOU WILL HAVE HOURS OF ENTERTAINMENT!!
Not just with the assembly, when you have your complete set made up.
YOU WILL BE ABLE TO ADMIRE AND HANDLE IT UNTIL BOREDOM!!!
Below you can see the diagram and the bending video of the assemblies, which we will soon complement with more visual information so that you can glue better. How to assemble assemblies
- Fold in or out as indicated in the figure.
- Glue the bottom area (feet) to the back area of the figure (back).
- Continue gluing the top section (head) to the back and left side of the figure.
- Glue the upper front section to both sides of the figure simultaneously, inserting the tabs.
- Finish by gluing the lower front section.


